On this page
The Sweet command line tool is able to import, export and copy Sweet application instances.
There are many options with the operations. The different operations are explained below.
Getting help
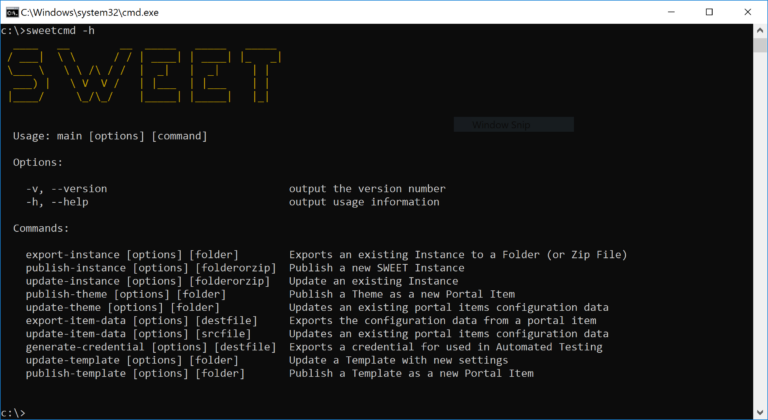
To get help, simply run the following
$ sweetcmd -h
To get help for a specific command:
$ sweetcmd <command> -h
Common options
Most operations require a set of common options, such as your identity and URL details for ArcGIS Enterprise and Sweet.
If options are not provided, but required, you will be prompted by the command line tool.
Server URL
If using on premise you will need to provide the URL to your Sweet server in many of your commands.
-s "http://<server_url>/sweet"
--server
Portal URL
If using on premise you will need to provide the URL to your ArcGIS portal, or if you’re using ArcGIS Online, use the below URL.
-a "https://www.arcgis.com/sharing"
or --arcgisportal
Username (only required if token is not used)
This refers to the portal username to authenticate operations.
-u username
Password (only required if token is not used)
This refers to the portal password to authenticate operations.
-p password
Popup login window (OAUTH)
You can use an authentication window to log in and generate a token. Use the -u option and set it to OAUTH, a window will then open asking you to log in.
-u OAUTH
Token (only required if username and password are not used)
Instead of using a username and password you can pass in a token that you have generated yourself.
-t token
Client ID
When using a token or popup login options you need to also pass in the client ID for Sweet.
-c clientId
Portal folder
Many of the commands will write data to your portal. You can specify the folder name in which to write portal items.
-f <FolderName>
Use integrated Windows authentication
If you wish to use integrated Windows authentication, you will need to log in with the popup window. For example, to export an instance use integrated Windows authentication, input the code below.
$ sweetcmd export-instance "FOLDER_OR_ZIP_FILE" -u OAUTH -c "CLIENTID"
Publishing a Sweet theme
To publish a custom theme/skin in Sweet, you must provide Sweet with a folder containing your custom skin.
A sample custom skin can be found in the folder samples/example-theme.
$ sweetcmd publish-theme <SOURCE-FOLDER>
Updating a Sweet theme
If you have already published a custom theme, you can update it using:
$ sweetcmd update-theme "SOURCE-FOLDER" -i "ITEMID"
Export item data
This command allows you to export any portal item’s configuration data to a file:
$ sweetcmd export-item-data "DEST_FILE" -i "ITEMID"
Update item data
This command allows you to update any portal item’s configuration data using the contents of a file on your computer:
$ sweetcmd update-item-data "SRC_FILE" -i "ITEMID"
Exporting a Sweet instance
The export-instance command will export all of the configuration for a Sweet instance into a folder or zip file.
The tool will read all the metadata from services, web maps and the Sweet configuration itself into the export.
The tool will create a sources file which lists all the services that the Sweet configuration uses. This can be copied and adapted so that when publishing a Sweet instance (from the export), you can create/clone services. This file can be found in schema/mapping.json
$ sweetcmd export-instance "FOLDER_OR_ZIP_FILE"
Publishing a Sweet instance
The publish-instance command will publish a Sweet instance from the data contained in the configuration folder / zip file.
$ sweetcmd publish-instance "FOLDER_OR_ZIP_FILE"
By default the publish will just reference the existing web maps and services. If you use the -m clone option, then the publisher will create a new web map and services based on the contents of the sources.json file.
If you use the -m “” option, then the instance will be published in accordance with the publish-action tags set in the mapping file. The original sources.json file will be read in and used to fill in any missing settings.
If you use -e “destination file path”, then a new mapping file will be created with the new mappings that have been created. This can be used for repeatedly updating over services that have been created as part of a previous publish. This is used for regular deployments from dev to test to live.
Updating a Sweet instance
The update-instance command will update a Sweet instance with the configuration in the configuration folder / zip file.
$ sweetcmd update-instance "FOLDER_OR_ZIP_FILE"
The update command will NOT create new web maps or services. It will reference the existing services in sources.json. If you pass in -m, then the references will be merged with those in the mapping file.